showing posts tagged #mechanical_keyboards — clear

0

Alternative to the Yunzii C75 Cat Cake that is just as cute and supports VIA?

preview

This Yunzii keyboard is the most adorable thing ever (it’s a cat!! it has all the different colours! the fun key caps! the fish USB dongle stored in its paw!) AND has hotswap switches, but unfortunately, it uses a proprietary web-based software instead of VIA. Is there any good keyboards are that are equally cute with open-source QMK firmware and VIA support?

Bonus points if it features an animal friend too

This Yunzii keyboard is the most adorable thing ever (it’s a cat!! it has all the different colours! the fun key caps! the fish USB dongle stored in its paw!) AND has hotswap switches, but unfortunately, it uses a proprietary web-based software instead of VIA. Is there any good keyboards are that are equally cute with open-source QMK firmware and VIA support?

Bonus points if it features an animal friend too

0

Total newbie on a dell office keyboard - Question about noise on mechanical keyboards

preview

Hi, how’s it going? I was looking up mechanical keyboards and people saying they feel so much better to use (my membrane doesn’t feel to bad at all so it really intrigues me how something could be better, I’ve never tried mechanical keyboards before)

And alongside that, I wonder if a mechanical keyboard can be as quiet/quieter than a regular membrane keyboard, I don’t wanna bother the humans around me with loud af clicky noises.

Hi, how’s it going? I was looking up mechanical keyboards and people saying they feel so much better to use (my membrane doesn’t feel to bad at all so it really intrigues me how something could be better, I’ve never tried mechanical keyboards before)

And alongside that, I wonder if a mechanical keyboard can be as quiet/quieter than a regular membrane keyboard, I don’t wanna bother the humans around me with loud af clicky noises.

0

RK61Pro - Is this keyboard realy QMK compatible? How do I enter flash mode?

preview

Hey everyone,

I bought a RK61Pro with the intent to flash a custom QMK onto the board. It was my understanding that Royal Kludge does somewhat OK flashable QMK keyboards that also offer wireless, but I’m not a bit worried now that this keyboard isn’t compatible.

I looked under the space key for the flash button as reported on the RK61 section of mk_firmware/keyboards and there was notably no button where I expected. Similarly, any attempt to hold escape or fn+escape or any of that when booting the keyboard did not result in a bootloader state like I’d expect.

Perhaps I’ve been mislead, but is the RK61Pro not a valid QMK keyboard as it’s advertised on Amazon? I’ve had a few issues with this keyboard up until now and was hoping to be able to flash it to remove some of the complex layer-state management that comes with the keyboards default configuration, but perhaps I’ll have to complain to amazon about this product being misleading.

Hey everyone,

I bought a RK61Pro with the intent to flash a custom QMK onto the board. It was my understanding that Royal Kludge does somewhat OK flashable QMK keyboards that also offer wireless, but I’m not a bit worried now that this keyboard isn’t compatible.

I looked under the space key for the flash button as reported on the RK61 section of mk_firmware/keyboards and there was notably no button where I expected. Similarly, any attempt to hold escape or fn+escape or any of that when booting the keyboard did not result in a bootloader state like I’d expect.

Perhaps I’ve been mislead, but is the RK61Pro not a valid QMK keyboard as it’s advertised on Amazon? I’ve had a few issues with this keyboard up until now and was hoping to be able to flash it to remove some of the complex layer-state management that comes with the keyboards default configuration, but perhaps I’ll have to complain to amazon about this product being misleading.

0

xpost: I made a dedicated controller for Endless Sky (FOSS overhead space shooter/trader)

preview

cross-posted from: lemmy.world/post/51637498

Okay, so by “controller” I just mean a specialized mechanical keyboard. Endless Sky is a spiritual successor to the Escape Velocity games.

  • Gateron Black for most of the keyboard switches
  • Also got momentary toggle switches and a light duty aluminum push button, because Millennium Falcon and Top Gun.
  • “DSA” and “F10” profile keycaps
  • laser cut (painted Masonite) and 3D printed (PLA)enclosure
  • Layout built around the in-cockpit control mapping
  • Hand-wired (aka “Dead Bug”) keyboard matrix
  • QMK/VIAL programmable firmware on my last Promicro with a Micro-USB cable.
  • Dymo-style embossing tape labels!!!

cross-posted from: lemmy.world/post/51637498

Okay, so by “controller” I just mean a specialized mechanical keyboard. Endless Sky is a spiritual successor to the Escape Velocity games.

  • Gateron Black for most of the keyboard switches
  • Also got momentary toggle switches and a light duty aluminum push button, because Millennium Falcon and Top Gun.
  • “DSA” and “F10” profile keycaps
  • laser cut (painted Masonite) and 3D printed (PLA)enclosure
  • Layout built around the in-cockpit control mapping
  • Hand-wired (aka “Dead Bug”) keyboard matrix
  • QMK/VIAL programmable firmware on my last Promicro with a Micro-USB cable.
  • Dymo-style embossing tape labels!!!
0

Is there any way to rearrange the positions of keys/switches entirely?

preview

Hopefully I can make this clear with an example. On my current keyboard, Alt is directly under X and Win is directly under Z. On most of the models of mechanical keyboards I have looked at, those keys are shifted well to the left of where I am used to. The bottom row layout is often (3 keys, spacebar, 4 keys). If I could switch it to (4 keys, spacebar, 3 keys), that would match what I am used to.

I am testing out an Aula F87, and I’ve found that the difference is not just cosmetic. I use the Alt and Win keys a lot between video games and my window manager, and it is substantially less comfortable to have to reach the additional distance so frequently.

How much work would I have to do to, or is it even possible at all, to move things around as described? If it’s not possible, does anyone have suggestions for finding a keyboard that matches what I want (other than just looking at pictures of lots of keyboards until I find one that looks comfortable)?

Hopefully I can make this clear with an example. On my current keyboard, Alt is directly under X and Win is directly under Z. On most of the models of mechanical keyboards I have looked at, those keys are shifted well to the left of where I am used to. The bottom row layout is often (3 keys, spacebar, 4 keys). If I could switch it to (4 keys, spacebar, 3 keys), that would match what I am used to.

I am testing out an Aula F87, and I’ve found that the difference is not just cosmetic. I use the Alt and Win keys a lot between video games and my window manager, and it is substantially less comfortable to have to reach the additional distance so frequently.

How much work would I have to do to, or is it even possible at all, to move things around as described? If it’s not possible, does anyone have suggestions for finding a keyboard that matches what I want (other than just looking at pictures of lots of keyboards until I find one that looks comfortable)?

0

TIL about typewriter USB keyboard conversion kits.

USB Typewriter www.usbtypewriter.com
preview

I love it. It’s elegantly simple piece of electronics, while also being an amazing audiovisual spectacle. For the whole office.

I love it. It’s elegantly simple piece of electronics, while also being an amazing audiovisual spectacle. For the whole office.

0

Stabilize THIS, ya filthy animals! DIY board with half-height blues and no stabs.

preview

More here. Bonus points to the first person to spot the keycaps I had to switch after taking the pic.

  • Leftover no-stabilizers PCB from old project
  • Pi Pico running ZMK
  • Outemu half-height blue (odd but kinda nice “ball catch” click mechanism)
  • VSA keycaps (except for the 1.75u SP DSA on Enter… thank you, otherwise ill-advised purchase of a keycap Grab Bag)
  • DIY laser cut plate
  • DIY 3D printed case
  • As always with my builds, a minimum of 17% jank is included for free.

More here. Bonus points to the first person to spot the keycaps I had to switch after taking the pic.

  • Leftover no-stabilizers PCB from old project
  • Pi Pico running ZMK
  • Outemu half-height blue (odd but kinda nice “ball catch” click mechanism)
  • VSA keycaps (except for the 1.75u SP DSA on Enter… thank you, otherwise ill-advised purchase of a keycap Grab Bag)
  • DIY laser cut plate
  • DIY 3D printed case
  • As always with my builds, a minimum of 17% jank is included for free.
0

Got an aluminum case for ten bucks. I hand-wired the guts.

preview

More here.

Corsair recently shut down Drop, their Keyboard/Audio/EDC brand that used to be Massdrop. In the fire sale, you could get a solid aluminum TKL (the “CTRL”) case for ten bucks. I have done quite a few handwired keyboards in the past few years, usually custom layouts (or else why bother?), but this seemed like an interesting challenge. The integrated switchplate was not milled to very tight tolerances, so I had to find the manufacturing files for an open source aftermarket PCB and turn one of them into a DXF file for my laser, so I could use it as a dummy PCB to hold the switches still. I also had to 3D print a spacer to go between the case’s two halves, because the spacer/LED diffuser that originally went with that board was a separate part and I didn’t realize I’d need one until the site was shut down. I used an open source tool to generate a build of the open source “ZMK” firmware, and after some tedious troubleshooting and some structural hot-glue, everything works and from the outside it looks pretty normal. Caps are MOA profile from Amazon resale, and switches are generic reds (light linear), lubed and spring swapped so they’re heavy linears.

More here.

Corsair recently shut down Drop, their Keyboard/Audio/EDC brand that used to be Massdrop. In the fire sale, you could get a solid aluminum TKL (the “CTRL”) case for ten bucks. I have done quite a few handwired keyboards in the past few years, usually custom layouts (or else why bother?), but this seemed like an interesting challenge. The integrated switchplate was not milled to very tight tolerances, so I had to find the manufacturing files for an open source aftermarket PCB and turn one of them into a DXF file for my laser, so I could use it as a dummy PCB to hold the switches still. I also had to 3D print a spacer to go between the case’s two halves, because the spacer/LED diffuser that originally went with that board was a separate part and I didn’t realize I’d need one until the site was shut down. I used an open source tool to generate a build of the open source “ZMK” firmware, and after some tedious troubleshooting and some structural hot-glue, everything works and from the outside it looks pretty normal. Caps are MOA profile from Amazon resale, and switches are generic reds (light linear), lubed and spring swapped so they’re heavy linears.

0

A 65% mechanical keyboard Renegade based on Raspberry Pi Pico 2

Codeberg.org renegade codeberg.org
preview

A Mastodon user called Pepe masto.es/@peps has done this mechanical keyboard and has published the project in Codeberg with an open license just in case anyone wants to do it too.

A Mastodon user called Pepe masto.es/@peps has done this mechanical keyboard and has published the project in Codeberg with an open license just in case anyone wants to do it too.

0

Naturally, on 40s day I present you with a 60%.

preview

DIY 3D printed case for the Yushakobo Primer61 PCB I got in Japan over the holidays. I didn’t buy one of their BLE Pro Micro boards, but had a Nice!Nano clone, so I learned just enough ZMK to port it over and use it wirelessly. More HERE. Not my cleanest print, but I’m happy, and pretty stoked I didn’t set it on fire trying to use an unsupported MCU with a wireless firmware.

DIY 3D printed case for the Yushakobo Primer61 PCB I got in Japan over the holidays. I didn’t buy one of their BLE Pro Micro boards, but had a Nice!Nano clone, so I learned just enough ZMK to port it over and use it wirelessly. More HERE. Not my cleanest print, but I’m happy, and pretty stoked I didn’t set it on fire trying to use an unsupported MCU with a wireless firmware.

0

I made some 3D-printed nesting keycap trays

preview

I’ve printed up 7 of these, plus I have a lid and one less-satisfying prototype from my diode laser. They fit in the footprint of a sheet of US Letter paper, hold a little over a TKL’s worth of keycaps, and use about 1/6 of a 1kg roll of filament, so maybe USD $3 per try with the cheap PLA I always buy.

I’ve printed up 7 of these, plus I have a lid and one less-satisfying prototype from my diode laser. They fit in the footprint of a sheet of US Letter paper, hold a little over a TKL’s worth of keycaps, and use about 1/6 of a 1kg roll of filament, so maybe USD $3 per try with the cheap PLA I always buy.

0

CHERRY XTRFY MX 8.3 TKL WIRELESS Gaming Keyboard Review - MADSHRIMPS

preview

The new CHERRY XTRFY MX 8.3 TKL keyboard is pricy but offers top-notch construction quality, a multitude of inner layers for eliminating vibrations and minimizing the noise, a high polling rate on both wireless and wired connectivity modes, while the included color screen allows access to multiple features without touching…

The new CHERRY XTRFY MX 8.3 TKL keyboard is pricy but offers top-notch construction quality, a multitude of inner layers for eliminating vibrations and minimizing the noise, a high polling rate on both wireless and wired connectivity modes, while the included color screen allows access to multiple features without touching…

0

Layers: one button not working on layer 1

preview

Hey, thought I’d try our collective knowledge :)

I’m using layers as in this post, i.e.:

but when I hold the MO(1) button, the “a” button doesn’t do anything… qwesdzxcv just fine, but not the “a”… while that button works just as intended on layer 0.

What could this be?

I’m using Vial for the keymap config, if that helps. Thanks for your thoughts!

Hey, thought I’d try our collective knowledge :)

I’m using layers as in this post, i.e.:

but when I hold the MO(1) button, the “a” button doesn’t do anything… qwesdzxcv just fine, but not the “a”… while that button works just as intended on layer 0.

What could this be?

I’m using Vial for the keymap config, if that helps. Thanks for your thoughts!

0

Share your keymap config

preview

I’m not finding any place where people share their keymap config (if that’s the right way to refer to how you’ve configured which key has which actions bound to it), so here goes mine - and I hope to have feedback and to be inspired by yours, as well!

From some awesome inspiration, I updated the setup :-) thanks!

I moved the layer switcher to the left hand, and moved backspace to my thumb, so I don’t strain my pinky so much.

I moved the arrows to right under my right hand… and added a button to make the switch to this gamer layer permanent. So basically, to go from layer 0 to layer 1 permanently, hold left thumb button, tap right thumb button. Tap left thumb button to switch back to layer 0.

And I added a num pad, also right under my right hand, where I’d expect it.


original: I just got my first mech keyboard with fewer keys than a ‘regular’ keyboard, and set it up this way:

with the TG(1) switching to layer 2 for gaming/some extra symbols:

and the home row is modded to GASC like in precondition.github.io/home-row-mods#how-to-use-h… with 160ms tapping term.

I am mostly struggling to get used to this way of typing and I still spend a lot of time on finding symbols, or correcting extra or missed keystrokes. But, I’ll try to update this when I have more experience. Critique away!

I’m not finding any place where people share their keymap config (if that’s the right way to refer to how you’ve configured which key has which actions bound to it), so here goes mine - and I hope to have feedback and to be inspired by yours, as well!

From some awesome inspiration, I updated the setup :-) thanks!

I moved the layer switcher to the left hand, and moved backspace to my thumb, so I don’t strain my pinky so much.

I moved the arrows to right under my right hand… and added a button to make the switch to this gamer layer permanent. So basically, to go from layer 0 to layer 1 permanently, hold left thumb button, tap right thumb button. Tap left thumb button to switch back to layer 0.
And I added a num pad, also right under my right hand, where I’d expect it.


original: I just got my first mech keyboard with fewer keys than a ‘regular’ keyboard, and set it up this way:

with the TG(1) switching to layer 2 for gaming/some extra symbols:

and the home row is modded to GASC like in precondition.github.io/home-row-mods#how-to-use-h… with 160ms tapping term.

I am mostly struggling to get used to this way of typing and I still spend a lot of time on finding symbols, or correcting extra or missed keystrokes. But, I’ll try to update this when I have more experience. Critique away!

0

Cherry gives up German production and wants to sell core division

heise online Cherry gives up German production and wants to sell core division www.heise.de
preview

cross-posted from: lemmy.zip/post/53920465

cross-posted from: lemmy.bestiver.se/post/764478

Comments

cross-posted from: lemmy.zip/post/53920465

cross-posted from: lemmy.bestiver.se/post/764478

Comments

0

Can i save this PCB? Is there a good way to desolder the other switches if not?

preview

I accidentally soldered a switch on crooked. I got the switch off the board but i’m having trouble cleaning out the holes so i can put a new switch in.

Can this switch footprint be saved after being clogged with solder and melted a little, or should i try to get the other switches off and start over on a new board?

And what’s the best way to desolder these switches if i have to remove the rest?

I accidentally soldered a switch on crooked. I got the switch off the board but i’m having trouble cleaning out the holes so i can put a new switch in.

Can this switch footprint be saved after being clogged with solder and melted a little, or should i try to get the other switches off and start over on a new board?

And what’s the best way to desolder these switches if i have to remove the rest?

0

Made a DIY board to evoke old Honeywell terminal keyboards

preview

I had spare PCBs left over from an earlier project. I got the Signature Plastics DSS Honeywell keycaps on sale from a vendor who was closing down. I made the plate design using online tools, then cut it and the bottom plate on my home laser. I designed the 3D-printed case to look like the original terminal keyboards that inspired the keycaps. I used black switches because a heavy linear feels right for something like this. Firmware is QMK/VIAL. More info here. There’s much that could be better, but I’m pleased with how it came out.

I had spare PCBs left over from an earlier project. I got the Signature Plastics DSS Honeywell keycaps on sale from a vendor who was closing down. I made the plate design using online tools, then cut it and the bottom plate on my home laser. I designed the 3D-printed case to look like the original terminal keyboards that inspired the keycaps. I used black switches because a heavy linear feels right for something like this. Firmware is QMK/VIAL. More info here. There’s much that could be better, but I’m pleased with how it came out.

0

What are the different kinds of pins on a microcontroller for? And, how do you fit a microcontroller onto a crowded PCB?

preview

cross-posted from: lemmy.world/post/37481146

I’m making a custom keyboard with a Raspberry Pi Pico as the MCU, and i don’t understand what all the different pins are for and how they should be wired up to my key matrix and trackpoint.

My current understanding is that GPIO are normal pins that can be wired to the rows and columns, but what of VBUS, VSYS, 3V3, and all the others that aren’t just GPIO or GND? And how should the ground pins be used here?

The schematic currently doesn’t include the trackpoint because i’m planning to hand wire it and the MCU to the PCB, so i can put them under the PCB in the case and i don’t have to try to fit them onto the board. Is there a better way to connect these that won’t require adding a bunch of space to the board to fit the MCU?

cross-posted from: lemmy.world/post/37481146

I’m making a custom keyboard with a Raspberry Pi Pico as the MCU, and i don’t understand what all the different pins are for and how they should be wired up to my key matrix and trackpoint.

My current understanding is that GPIO are normal pins that can be wired to the rows and columns, but what of VBUS, VSYS, 3V3, and all the others that aren’t just GPIO or GND? And how should the ground pins be used here?

The schematic currently doesn’t include the trackpoint because i’m planning to hand wire it and the MCU to the PCB, so i can put them under the PCB in the case and i don’t have to try to fit them onto the board. Is there a better way to connect these that won’t require adding a bunch of space to the board to fit the MCU?

0

Keebuilder is the mechanical keyboard cataloging and sharing app I've been waiting for

Guilty Gamer Keebuilder is the mechanical keyboard cataloging and sharing app I've been waiting for guiltygamer.com
preview

I was counting my boards a few weeks ago and realized I had enough to post one every week for the next year. I’m three weeks into this project, and recently discovered an app called Keebuilder. I’ve been using it to catalog and share my builds as I take images every week. Over the years I’ve built so many I’ve forgotten what I built them with, so am using Keebuilder to index that info as I look up my receipts. Soon enough I’ll finally have a database of all of my builds, thanks to Keebuilder.

OC text by @Moltz@lemmy.ml

I was counting my boards a few weeks ago and realized I had enough to post one every week for the next year. I’m three weeks into this project, and recently discovered an app called Keebuilder. I’ve been using it to catalog and share my builds as I take images every week. Over the years I’ve built so many I’ve forgotten what I built them with, so am using Keebuilder to index that info as I look up my receipts. Soon enough I’ll finally have a database of all of my builds, thanks to Keebuilder.

OC text by @Moltz@lemmy.ml

0

You should care more about the stabilizers in your mechanical keyboard—here’s why - Ars Technica

Ars Technica You should care more about the stabilizers in your mechanical keyboard—here’s why arstechnica.com
preview

While most people don’t spend a lot of time thinking about the keys they tap all day, mechanical keyboard enthusiasts certainly do. As interest in DIY keyboards expands, there are plenty of things to obsess over, such as keycap sets, layout, knobs, and switches. But you have to get deep into the hobby before you realize there’s something more important than all that: the stabilizers.

Even if you have the fanciest switches and a monolithic aluminum case, bad stabilizers can make a keyboard feel and sound like garbage. Luckily, there’s a growing ecosystem of weirdly fancy stabilizers that can upgrade your typing experience, packing an impressive amount of innovation into a few tiny bits of plastic and metal.

ending:

Still, a good-quality set of stabilizers, properly installed and lubricated, is probably the best upgrade you can make to a mechanical keyboard in spite of tariffs. The duty paid on a $20–30 item won’t break the bank, and it really will make your keyboard better.

While most people don’t spend a lot of time thinking about the keys they tap all day, mechanical keyboard enthusiasts certainly do. As interest in DIY keyboards expands, there are plenty of things to obsess over, such as keycap sets, layout, knobs, and switches. But you have to get deep into the hobby before you realize there’s something more important than all that: the stabilizers.

Even if you have the fanciest switches and a monolithic aluminum case, bad stabilizers can make a keyboard feel and sound like garbage. Luckily, there’s a growing ecosystem of weirdly fancy stabilizers that can upgrade your typing experience, packing an impressive amount of innovation into a few tiny bits of plastic and metal.

ending:

Still, a good-quality set of stabilizers, properly installed and lubricated, is probably the best upgrade you can make to a mechanical keyboard in spite of tariffs. The duty paid on a $20–30 item won’t break the bank, and it really will make your keyboard better.

0

I'm working on a custom split keyboard and i have questions.

preview

cross-posted from: lemmy.world/post/36216357

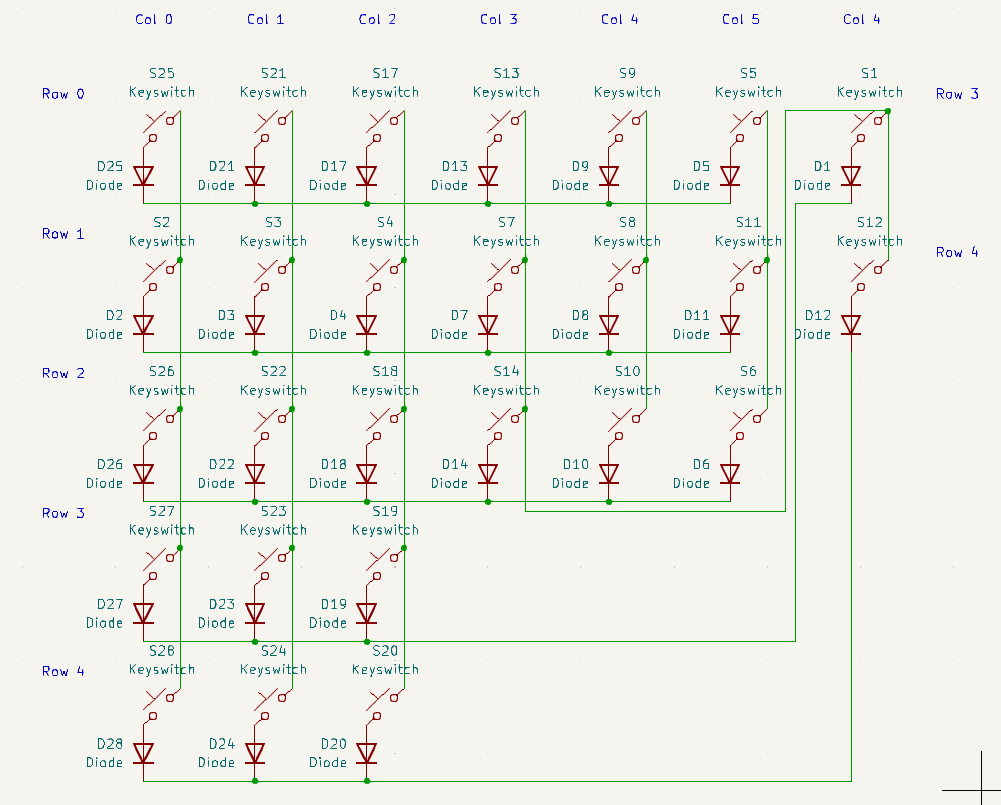
Here’s what the layout should look like when it’s done, and what the schematic for the right half looks like now. I’ve seen Joe Scotto’s tutorial on the subject.

I’m currently making a schematic for this keyboard in KiCad v7.0. The schematic has the power & backspace keys moved down near the thumb keys to use one fewer pin on the controller, hence the slightly messy wiring.

  • What controller should i use for a keyboard like this? How many more pins will it need than just the 5 columns and 6 rows on each side?
  • What USB connector ports should i use? What are the differences between one USB-C port and another?
  • Do i need a controller for each part of the keyboard, or only for the part that plus into the computer?
  • Where can i get KiCad files for a trackpoint so i can add that to the schematic and PCB?
  • I’ve only ever owned one mechanical keyboard (Chouchou by dlip) and it doesn’t look like it has any diodes. Do i need those or not?
  • Can i hide the controller and ports in a case if i’m using low-profile switches and caps?

Thanks in advance.

cross-posted from: lemmy.world/post/36216357

Here’s what the layout should look like when it’s done, and what the schematic for the right half looks like now. I’ve seen Joe Scotto’s tutorial on the subject.

I’m currently making a schematic for this keyboard in KiCad v7.0. The schematic has the power & backspace keys moved down near the thumb keys to use one fewer pin on the controller, hence the slightly messy wiring.

  • What controller should i use for a keyboard like this? How many more pins will it need than just the 5 columns and 6 rows on each side?
  • What USB connector ports should i use? What are the differences between one USB-C port and another?
  • Do i need a controller for each part of the keyboard, or only for the part that plus into the computer?
  • Where can i get KiCad files for a trackpoint so i can add that to the schematic and PCB?
  • I’ve only ever owned one mechanical keyboard (Chouchou by dlip) and it doesn’t look like it has any diodes. Do i need those or not?
  • Can i hide the controller and ports in a case if i’m using low-profile switches and caps?

Thanks in advance.

0

It's got a METH key!

preview

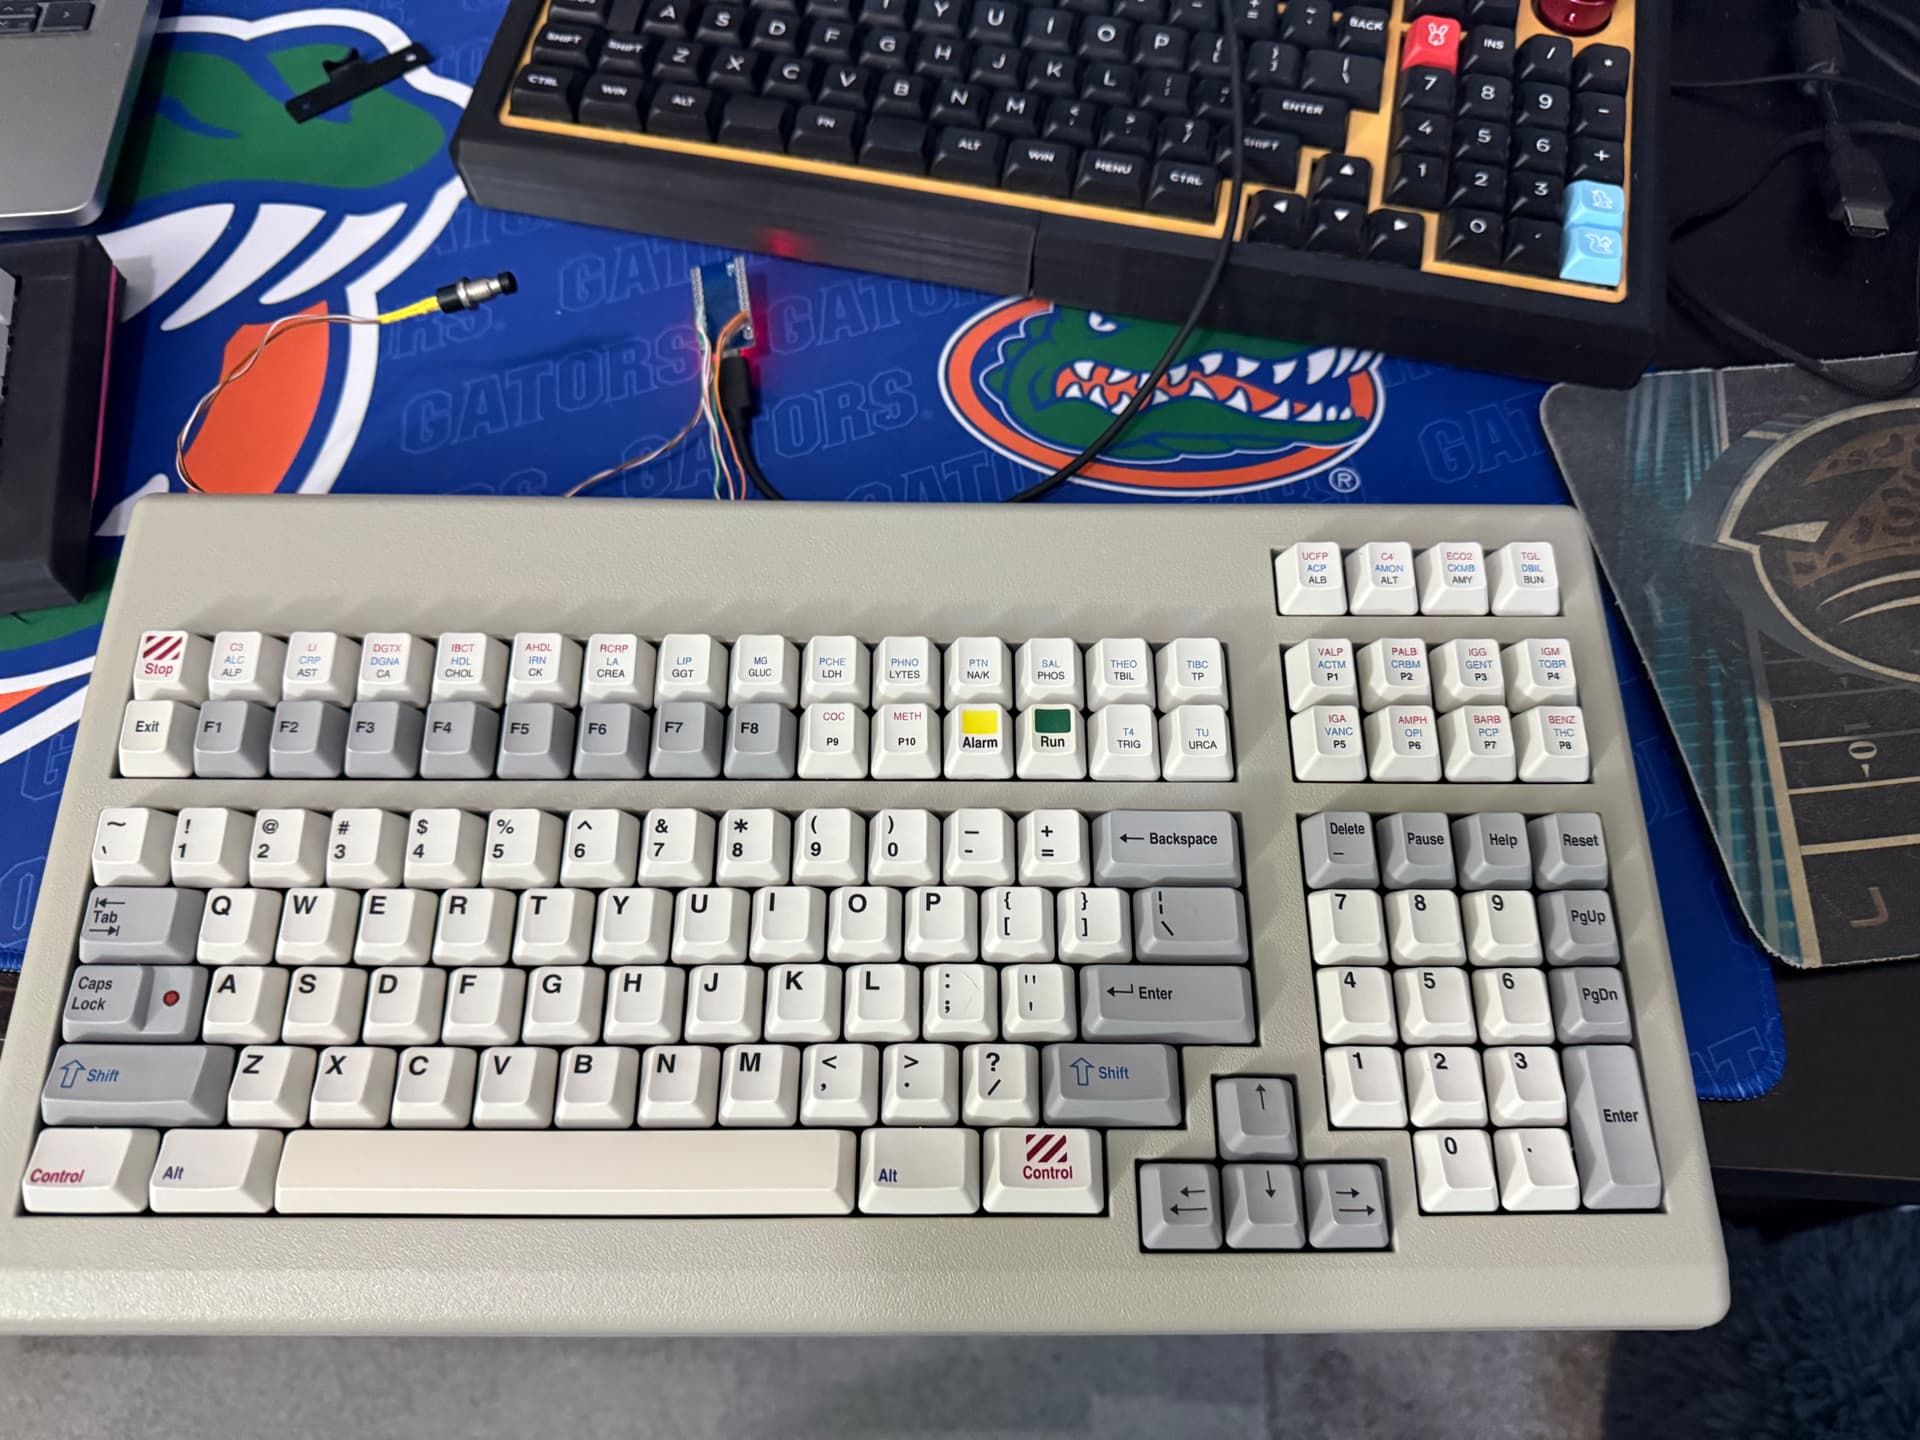
Keyboard from 2010 built by TG3 for a Siemens chemistry analyzer. I cleaned it up, added some weight to the bottom, and converted to USB. Cherry MX Black and PBT Dye-subbed DCS caps. Take a peek at what should be F9 and F10 (and are after conversion), as well as some of the keys above the numpad, which, tangentially, now has 5 keys that do absolutely nothing related to what’s written on them.

Keyboard from 2010 built by TG3 for a Siemens chemistry analyzer. I cleaned it up, added some weight to the bottom, and converted to USB. Cherry MX Black and PBT Dye-subbed DCS caps. Take a peek at what should be F9 and F10 (and are after conversion), as well as some of the keys above the numpad, which, tangentially, now has 5 keys that do absolutely nothing related to what’s written on them.

0

Lenovo 10e fully converted to Debian for use as a "Writer Deck" (xpost)

preview

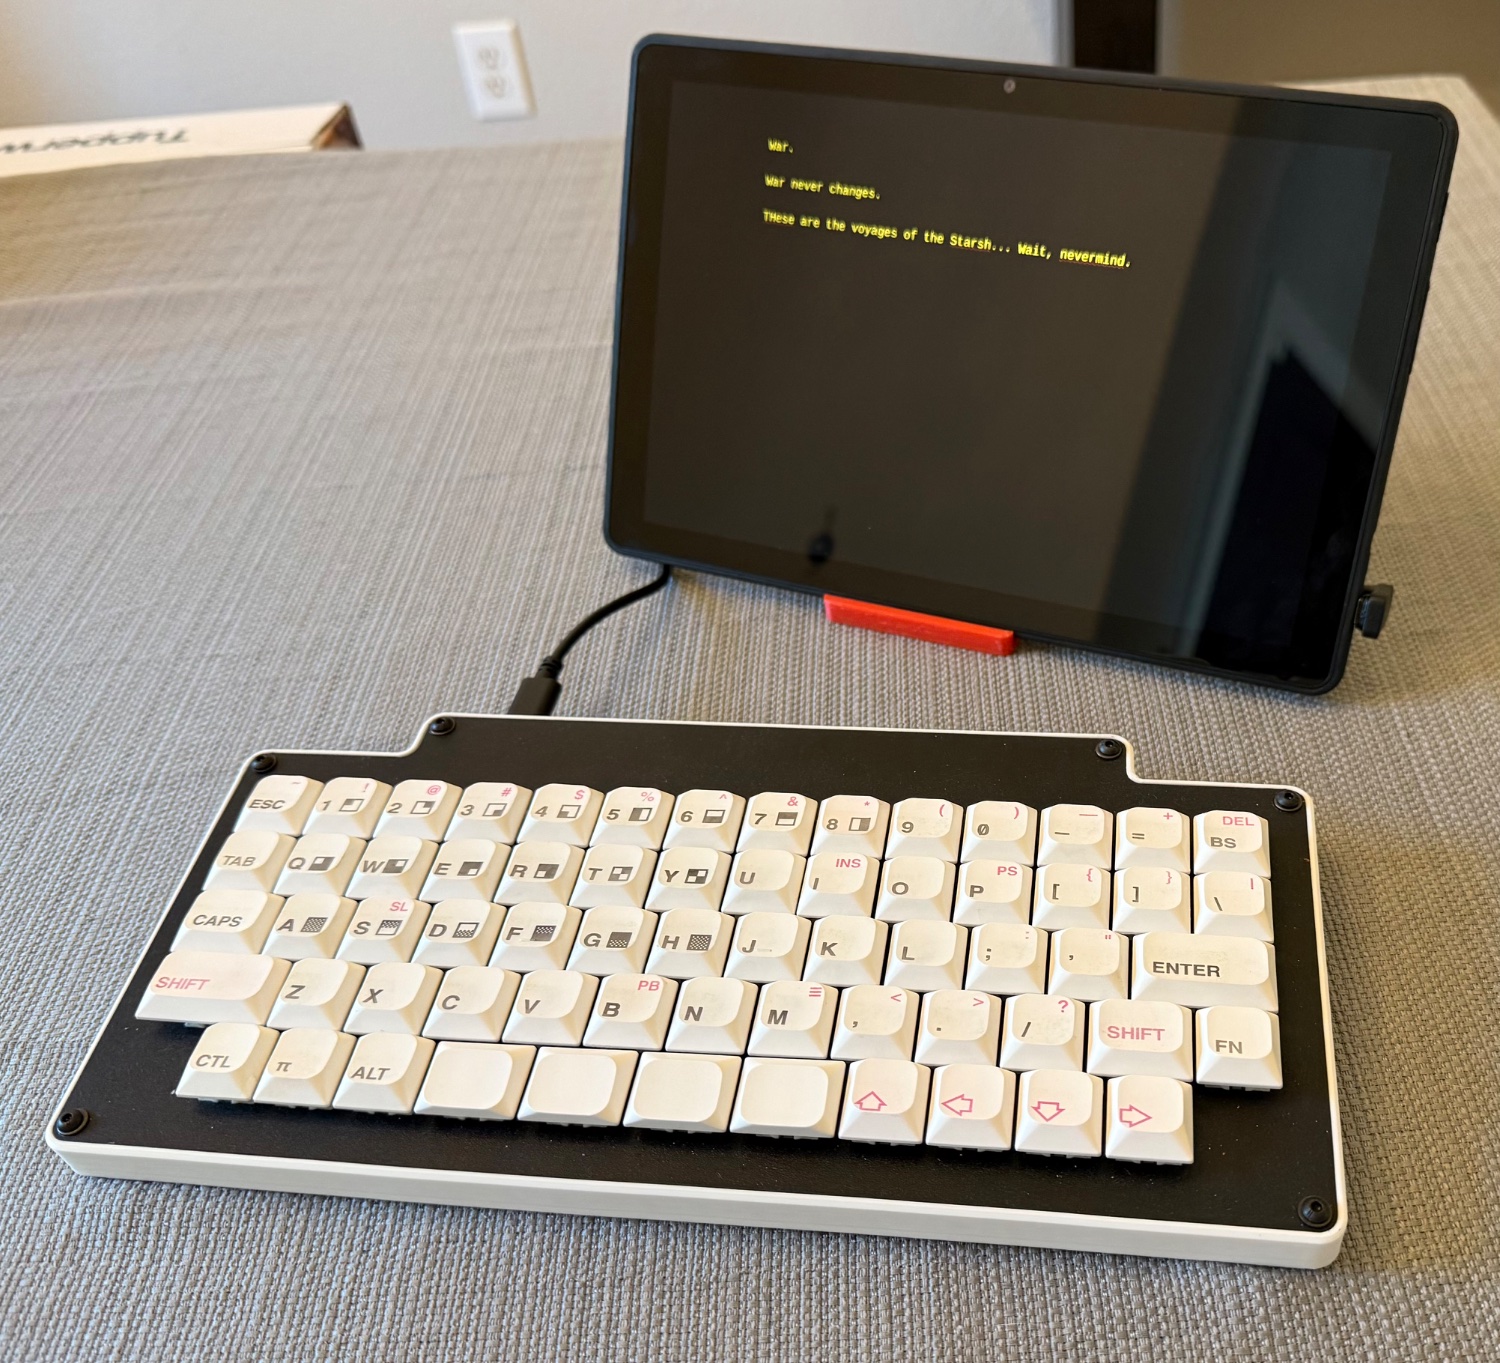
Keyboard is one I first made a year or so ago, but recently upgraded a little. DIY with laser-cut Masonite plate, 3D printed sides, Outemu “mid height” Black switches, and JWA PBT low-profile keycaps with DIY legends. KMK firmware on an RP2040 dev board.

cross-posted from: lemmy.world/post/35772689

Putting the cart before the horse a bit here, as I haven’t been writing much lately, but I got this education market ARM Chrome tablet pretty cheap and followed some instructions to get it fully converted to Linux. ChromeOS is gone. It’s running Debian Trixie via the “velvetOS” project. I could’ve just used the Linux container in chrome OS, but everything has such high guardrails that even the most minor of customizations got very frustrating. Anyway, I specifically picked the 10E because it was known to at least mostly support Linux.

Some limitations, as the camera doesn’t work, I don’t think the external speakers work (could be specific to this particular boot image), and on full boot I have to manually rotate the screen to make sure the touchscreen coordinates stay aligned with the display. Otherwise it works surprisingly well.

Firefox is probably too slow on this old MT8183 with 4 GB of RAM, but it is much faster on the EMMC install compared to the USB, and it was not torture to go online and grab a couple of files directly. The word processor is Focuswriter with their green theme tweaked to amber and it runs perfectly. Suspend/resume is working well enough with auto-login that I can just leave Focuswriter up. Battery life is an open question, but before I wiped it, Chrome OS reported it had 96% battery health 🤷. With a mobile-grade SoC, and with Bluetooth and Wi-Fi turned off, I’m optimistic it won’t be too bad.

I also fixed up one of my DIY mechanical keyboards, and I think it’s a pretty nice little writing setup. Right now, I just have Wi-Fi turned off, but I could theoretically strip out the drivers altogether, or (if I remember correctly), even take the Wi-Fi module out of this one. I opened it briefly to short out the hardware write protection on the firmware, but forgot to look for the Wi-Fi card. As an aside, this was by far the easiest I could imagine a tablet being to service — zero glue connecting screen to case.

Keyboard is one I first made a year or so ago, but recently upgraded a little. DIY with laser-cut Masonite plate, 3D printed sides, Outemu “mid height” Black switches, and JWA PBT low-profile keycaps with DIY legends. KMK firmware on an RP2040 dev board.

cross-posted from: lemmy.world/post/35772689

Putting the cart before the horse a bit here, as I haven’t been writing much lately, but I got this education market ARM Chrome tablet pretty cheap and followed some instructions to get it fully converted to Linux. ChromeOS is gone. It’s running Debian Trixie via the “velvetOS” project. I could’ve just used the Linux container in chrome OS, but everything has such high guardrails that even the most minor of customizations got very frustrating. Anyway, I specifically picked the 10E because it was known to at least mostly support Linux.

Some limitations, as the camera doesn’t work, I don’t think the external speakers work (could be specific to this particular boot image), and on full boot I have to manually rotate the screen to make sure the touchscreen coordinates stay aligned with the display. Otherwise it works surprisingly well.

Firefox is probably too slow on this old MT8183 with 4 GB of RAM, but it is much faster on the EMMC install compared to the USB, and it was not torture to go online and grab a couple of files directly. The word processor is Focuswriter with their green theme tweaked to amber and it runs perfectly. Suspend/resume is working well enough with auto-login that I can just leave Focuswriter up. Battery life is an open question, but before I wiped it, Chrome OS reported it had 96% battery health 🤷. With a mobile-grade SoC, and with Bluetooth and Wi-Fi turned off, I’m optimistic it won’t be too bad.

I also fixed up one of my DIY mechanical keyboards, and I think it’s a pretty nice little writing setup. Right now, I just have Wi-Fi turned off, but I could theoretically strip out the drivers altogether, or (if I remember correctly), even take the Wi-Fi module out of this one. I opened it briefly to short out the hardware write protection on the firmware, but forgot to look for the Wi-Fi card. As an aside, this was by far the easiest I could imagine a tablet being to service — zero glue connecting screen to case.

0

YushaKobo in Akihabara today

preview

OC by @not_woody_shaw@lemmy.world

It’s amazing being able to see and try out so many crazy and interesting keyboards in one place. Stuff that even bigger places like Bic Camera don’t have, and that you could never imagine e seeing in a shop back in the UK. I picked up a Rainy75 and a set of WS BigLucky Tactiles to go with it. I’m looking forward to getting home to try it all out for real and get familiar with the setup. I’m also kinda weirded out to not hate the linear switches that the Rainy comes with. Shop guy Olodeh (hope I got your name right bro!) was super helpful, and overall a really positive experience. My favourite thing was the switch testers that show you on screen what each switch is, and some details about it. Some minor disappointments: no Boba U4T in stock today - i was looking forward to trying those; and no Wooting keebs for my gamer son to try out, although they did have another HE board that was above our price range, so at least we got a feel for that one.

OC by @not_woody_shaw@lemmy.world

It’s amazing being able to see and try out so many crazy and interesting keyboards in one place. Stuff that even bigger places like Bic Camera don’t have, and that you could never imagine e seeing in a shop back in the UK. I picked up a Rainy75 and a set of WS BigLucky Tactiles to go with it. I’m looking forward to getting home to try it all out for real and get familiar with the setup. I’m also kinda weirded out to not hate the linear switches that the Rainy comes with. Shop guy Olodeh (hope I got your name right bro!) was super helpful, and overall a really positive experience. My favourite thing was the switch testers that show you on screen what each switch is, and some details about it. Some minor disappointments: no Boba U4T in stock today - i was looking forward to trying those; and no Wooting keebs for my gamer son to try out, although they did have another HE board that was above our price range, so at least we got a feel for that one.

0

Predictive Tap-Hold — QMK Community Module for More Intuitive Home-Row Mods

GitHub qmk_modules/predictive_tap_hold at main · jgandert/qmk_modules github.com
preview

Like many of you, I’ve wrestled with the tap-hold dilemma: set a short TAPPING_TERM for quick holds at the cost of accidental activations, or lengthen it for more reliable tapping, which can make holds feel sluggish. While there are many clever settings to tweak, I often felt I had to significantly adapt my typing style to the algorithm, rather than the algorithm to me.

To explore a different approach, I’d like to share a QMK community module I’ve been working on called Predictive Tap-Hold (PTH). To predict whether a tap or a hold was intended, PTH analyzes event sequences, timing between presses, and which hand is used. For ambiguous cases, it relies on generated decision trees and evolved functions.

With the training dataset, these functions reached about 96% accuracy in distinguishing taps from holds. With another dataset, they still performed similarly. While that number might not sound ideal, it’s important to know that the dataset included a wide variety of typing styles and required a lot of filtering (77,614 of 168,593 participant datasets were used). While better data will lead to future improvements, no prediction is flawless, and there will likely always be an adjustment period.

PTH is also highly configurable, which I hope makes it easy to handle edge cases and match your personal typing style. For instance, an Instant Hold feature allows the hold function (even LT) to activate the moment you press the key, which is useful for things like holding LCTL_T and using the scroll wheel to zoom without any delay.

The module is designed with ergonomics in mind. By default, when a key like RSFT_T(KC_H) from the right side is pressed, it will only choose hold if the next keypress comes from the other side and no third key is pressed. This can help prevent same-hand fatigue and make taps more reliable.

I’ve also aimed to make PTH compatible with other great QMK features like Combos and Tap Dance.

My hope is that this module might help make powerful setups like home-row mods feel more accessible and intuitive. It’s now available as a QMK Community Module if you’re willing to experiment. Thank you for checking it out, and I would genuinely appreciate any feedback you might have. If you run into any problems, I’d love a message or a report in the repository.

Like many of you, I’ve wrestled with the tap-hold dilemma: set a short TAPPING_TERM for quick holds at the cost of accidental activations, or lengthen it for more reliable tapping, which can make holds feel sluggish. While there are many clever settings to tweak, I often felt I had to significantly adapt my typing style to the algorithm, rather than the algorithm to me.

To explore a different approach, I’d like to share a QMK community module I’ve been working on called Predictive Tap-Hold (PTH). To predict whether a tap or a hold was intended, PTH analyzes event sequences, timing between presses, and which hand is used. For ambiguous cases, it relies on generated decision trees and evolved functions.

With the training dataset, these functions reached about 96% accuracy in distinguishing taps from holds. With another dataset, they still performed similarly. While that number might not sound ideal, it’s important to know that the dataset included a wide variety of typing styles and required a lot of filtering (77,614 of 168,593 participant datasets were used). While better data will lead to future improvements, no prediction is flawless, and there will likely always be an adjustment period.

PTH is also highly configurable, which I hope makes it easy to handle edge cases and match your personal typing style. For instance, an Instant Hold feature allows the hold function (even LT) to activate the moment you press the key, which is useful for things like holding LCTL_T and using the scroll wheel to zoom without any delay.

The module is designed with ergonomics in mind. By default, when a key like RSFT_T(KC_H) from the right side is pressed, it will only choose hold if the next keypress comes from the other side and no third key is pressed. This can help prevent same-hand fatigue and make taps more reliable.

I’ve also aimed to make PTH compatible with other great QMK features like Combos and Tap Dance.

My hope is that this module might help make powerful setups like home-row mods feel more accessible and intuitive. It’s now available as a QMK Community Module if you’re willing to experiment. Thank you for checking it out, and I would genuinely appreciate any feedback you might have. If you run into any problems, I’d love a message or a report in the repository.