0

Post your links here

preview

Hi there!

I think it’d be fun to discover each other design profiles. I’m using cults3d right now but Thingiverse, myMiniFactory and everything else are okay, too.

Sharing your social media accounts is totally cool, too, if they are 3D printing related.

Hi there!

I think it’d be fun to discover each other design profiles. I’m using cults3d right now but Thingiverse, myMiniFactory and everything else are okay, too.

Sharing your social media accounts is totally cool, too, if they are 3D printing related.

0

Is the RocketChat down?

preview

For some reason the “Login with GitLab” button isn’t showing up in my browser (Opera GX). I’ve tried disabling extensions, using an Incognito window, all sorts of different things and the button doesn’t appear for me. Any idea why?

If I try to hit create account I just get this, but there’s no button.

For some reason the “Login with GitLab” button isn’t showing up in my browser (Opera GX). I’ve tried disabling extensions, using an Incognito window, all sorts of different things and the button doesn’t appear for me. Any idea why?

If I try to hit create account I just get this, but there’s no button.

0

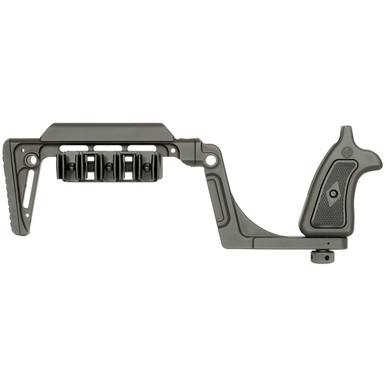
Seeking file for Midwest Industries Bounty Hunter Stock S&W X Frame

Midwest Industries, Inc. Bounty Hunter Smith & Wesson X Frame Stock & Arm Brace midwestindustriesinc.com
preview

I am looking for a wizard to create a functional STL file for this Midwest Industries Bounty Hunter folding revolver stock for an X frame Smith & Wesson 460 XVR. I love everything about the stock except for the fact that it’s $315. That’s just not feasible for me, so any assistance in this would be much appreciated!

I am looking for a wizard to create a functional STL file for this Midwest Industries Bounty Hunter folding revolver stock for an X frame Smith & Wesson 460 XVR. I love everything about the stock except for the fact that it’s $315. That’s just not feasible for me, so any assistance in this would be much appreciated!

0

Expanding my laptops HDD capacity

A laptop with a DIY HDD cage carrying 4 HDDs.
preview

cross-posted from: discuss.tchncs.de/post/66988984

What I have

I have an old Acer Aspire A515-51G and I also have a desire to have a home server. In combination this creates a need for the laptop to carry more HDDs than it can from factory. Usually it can take one M.2 SSD and one 2.5" SATA drive.

What I want

I want to make the laptop able to run at least 4 HDDs in RAID 5 for storage and have one SSD as boot drive.

What I did

The buying phase

  • 4 HDDs
  • M.2 to SATA adapter
  • 12V/5V SATA power converter
  • 12V 10A power supply

The designing phase

I needed space to hold the HDDs, so I designed a 3D printed a cage to attach to the bottom of my laptop. Two 80mm fans can be attach to it. You can see it on printables. Also I remixed a tray (here is the original) so the HDDs can slide in and out of the cage.

.

The assembly phase

A cutout at the bottom of the laptop was needed to give access to the SATA ports of the adapter.

I put a 2.5" SSD into the already present place for it in the laptop.

Then the cage was attached to the laptop, the HDDs were put in their trays, the trays inside the cage and the cables attached to the adapter and HDDs.

cross-posted from: discuss.tchncs.de/post/66988984

What I have

I have an old Acer Aspire A515-51G and I also have a desire to have a home server. In combination this creates a need for the laptop to carry more HDDs than it can from factory. Usually it can take one M.2 SSD and one 2.5" SATA drive.

What I want

I want to make the laptop able to run at least 4 HDDs in RAID 5 for storage and have one SSD as boot drive.

What I did

The buying phase

  • 4 HDDs
  • M.2 to SATA adapter
  • 12V/5V SATA power converter
  • 12V 10A power supply

The designing phase

I needed space to hold the HDDs, so I designed a 3D printed a cage to attach to the bottom of my laptop. Two 80mm fans can be attach to it. You can see it on printables. Also I remixed a tray (here is the original) so the HDDs can slide in and out of the cage.

.

The assembly phase

A cutout at the bottom of the laptop was needed to give access to the SATA ports of the adapter.

I put a 2.5" SSD into the already present place for it in the laptop.

Then the cage was attached to the laptop, the HDDs were put in their trays, the trays inside the cage and the cables attached to the adapter and HDDs.

0

rprsa INDX Update (Shipping starts this week!)

preview

cross-posted from: feddit.org/post/34304695

Hey everyone. Here’s the update that was emailed to Prusa INDX customers directly, attached here again for trasparency and convenience for interested parties outside of this group.


Hi,

We have another update regarding your INDX Conversion Kit order. This time, we have some good news and enough information to move forward, and start shipping later this week.

In our previous email, we shared Bondtech’s confirmation that the nozzles supplied for INDX are surface-hardened, rather than fully hardened as originally specified by Bondtech. We therefore postponed shipping while we investigated what this means in practice and waited for Bondtech to finalize the compensation for our customers. We have been running extensive wear tests ever since. Testing results

With standard carbon-fiber materials such as PETG-CF, PC-CF and PA-CF, we have so far struggled to wear the current INDX nozzles to the point where we can identify any deterioration in print quality.

Each of our PETG-CF nozzles went through 10 kg of material printed. The PC-CF nozzles currently track 5 kg of material and PA-CF about 2-3 kg each. We can measure some minimal wear at the nozzle orifice, but so far we have not seen a corresponding change in extrusion width, print accuracy or visible print quality.

That means the nozzles do wear, as all nozzles eventually do, but their real-world abrasion resistance is significantly better than Bondtech’s initial concerns suggested.

PETG Ultraglow serves as our accelerated wear test, since it is known to wear out most nozzles on the market at a fast rate. We are still accumulating more data, the topic of hardened nozzles is complex and interesting, so we will likely publish a larger blog post covering our findings.

If your main use case is a machine dedicated to printing abrasive materials, these nozzles are not the ideal solution.

Bondtech is investigating more wear-resistant nozzles, but there is currently no confirmed availability date, price, or guarantee that such a product will become available. We don’t want to keep your order waiting for something we cannot promise. Compensation for your order

Regardless of the test results, the current nozzle specification is different from what was advertised when you placed your order. Bondtech is therefore providing compensation for customers whose kits ship with these nozzles. Since you purchased your INDX from us, we will handle this compensation directly for you.

You can choose:

8-tool INDX kit: $160 / €140 Prusa Store credit, or $120 / €104 cash refund.

4-tool INDX kit: $80 / €70 Prusa Store credit, or $60 / €52 cash refund.

We will send out the vouchers via email in waves, synchronized with the shipping of individual INDX batches. If you can’t find the voucher in your inbox within 2-3 days after your INDX has arrived, please contact our tech support team. If you prefer the cash refund instead, you can request it by reaching out to our support via live chat or email. An additional gift from us

In the previous email, we’ve teased that regardless of the solution Bondtech offers, we’re adding something on top of that.

We can now reveal what it is: the newly announced hardware upgrade that turns your CORE One+ into the latest CORE One+ (Gen 2).

We include this upgrade for the initial batch Prusa INDX conversion kit orders, at our own expense. Specifically the new belts, the belt pulleys and new thermal expansion joints, all resulting in better print quality, faster print starts and better ease of use. So you can upgrade your printer to the latest version while installing the new INDX parts. You can find the installation instructions in our CORE One+ (Gen 2) upgrade guide. Shipping is ready to start this week

INDX Conversion Kits will ship in the existing queue, based on the date and time of the order, as we receive tool shipments from Bondtech. You do not need to do anything if you want to keep your order.

If the current nozzle specification doesn’t work for your use case, you can of course cancel your order before shipment and receive a full refund at no cost to you. After delivery, you will also remain covered by our extended 60-day return policy.

We know there has been a lot of information around the INDX nozzles over the past few weeks. We deliberately took the time to test them extensively before giving you another answer, and we’re happy that the real-world results are considerably more positive than our initial accelerated testing suggested.

Thank you again for your patience.

Prusa Research Team

cross-posted from: feddit.org/post/34304695

Hey everyone. Here’s the update that was emailed to Prusa INDX customers directly, attached here again for trasparency and convenience for interested parties outside of this group.


Hi,

We have another update regarding your INDX Conversion Kit order. This time, we have some good news and enough information to move forward, and start shipping later this week.

In our previous email, we shared Bondtech’s confirmation that the nozzles supplied for INDX are surface-hardened, rather than fully hardened as originally specified by Bondtech. We therefore postponed shipping while we investigated what this means in practice and waited for Bondtech to finalize the compensation for our customers. We have been running extensive wear tests ever since. Testing results

With standard carbon-fiber materials such as PETG-CF, PC-CF and PA-CF, we have so far struggled to wear the current INDX nozzles to the point where we can identify any deterioration in print quality.

Each of our PETG-CF nozzles went through 10 kg of material printed. The PC-CF nozzles currently track 5 kg of material and PA-CF about 2-3 kg each. We can measure some minimal wear at the nozzle orifice, but so far we have not seen a corresponding change in extrusion width, print accuracy or visible print quality.

That means the nozzles do wear, as all nozzles eventually do, but their real-world abrasion resistance is significantly better than Bondtech’s initial concerns suggested.

PETG Ultraglow serves as our accelerated wear test, since it is known to wear out most nozzles on the market at a fast rate. We are still accumulating more data, the topic of hardened nozzles is complex and interesting, so we will likely publish a larger blog post covering our findings.

If your main use case is a machine dedicated to printing abrasive materials, these nozzles are not the ideal solution.

Bondtech is investigating more wear-resistant nozzles, but there is currently no confirmed availability date, price, or guarantee that such a product will become available. We don’t want to keep your order waiting for something we cannot promise. Compensation for your order

Regardless of the test results, the current nozzle specification is different from what was advertised when you placed your order. Bondtech is therefore providing compensation for customers whose kits ship with these nozzles. Since you purchased your INDX from us, we will handle this compensation directly for you.

You can choose:

8-tool INDX kit: $160 / €140 Prusa Store credit, or $120 / €104 cash refund.

4-tool INDX kit: $80 / €70 Prusa Store credit, or $60 / €52 cash refund.

We will send out the vouchers via email in waves, synchronized with the shipping of individual INDX batches. If you can’t find the voucher in your inbox within 2-3 days after your INDX has arrived, please contact our tech support team. If you prefer the cash refund instead, you can request it by reaching out to our support via live chat or email. An additional gift from us

In the previous email, we’ve teased that regardless of the solution Bondtech offers, we’re adding something on top of that.

We can now reveal what it is: the newly announced hardware upgrade that turns your CORE One+ into the latest CORE One+ (Gen 2).

We include this upgrade for the initial batch Prusa INDX conversion kit orders, at our own expense. Specifically the new belts, the belt pulleys and new thermal expansion joints, all resulting in better print quality, faster print starts and better ease of use. So you can upgrade your printer to the latest version while installing the new INDX parts. You can find the installation instructions in our CORE One+ (Gen 2) upgrade guide. Shipping is ready to start this week

INDX Conversion Kits will ship in the existing queue, based on the date and time of the order, as we receive tool shipments from Bondtech. You do not need to do anything if you want to keep your order.

If the current nozzle specification doesn’t work for your use case, you can of course cancel your order before shipment and receive a full refund at no cost to you. After delivery, you will also remain covered by our extended 60-day return policy.

We know there has been a lot of information around the INDX nozzles over the past few weeks. We deliberately took the time to test them extensively before giving you another answer, and we’re happy that the real-world results are considerably more positive than our initial accelerated testing suggested.

Thank you again for your patience.

Prusa Research Team

0

I have no idea what's causing parts of my top layers to look so awful. anyone have ideas?

preview

Bambu p1s

Pla. Its been dried in dehydrator for 4 hours at 55

Ironing is off (seemed to be the same with ironing on)

Ive tried turning the temp down to 210

There is a prime tower and purging is set to 1x

Flow rate is 0.96

Aux fan is off

Relatively new nozzle (less than a couple months old and I dont print that often)

I dont know what other info might be relevant

Its not the absolute top surface though, the black icons are raised higher and those look fine.

Really at a loss. Does anyone have any ideas?

Bambu p1s

Pla. Its been dried in dehydrator for 4 hours at 55

Ironing is off (seemed to be the same with ironing on)

Ive tried turning the temp down to 210

There is a prime tower and purging is set to 1x

Flow rate is 0.96

Aux fan is off

Relatively new nozzle (less than a couple months old and I dont print that often)

I dont know what other info might be relevant

Its not the absolute top surface though, the black icons are raised higher and those look fine.

Really at a loss. Does anyone have any ideas?

0

What CAD software are you all using?

preview

I usually use FreeCAD but lately the constraints solver just feels kinda buggy, crapping out on even fairly simple geometries.

FreeCAD is honestly quite well suited to the 3D modeling I do. Geometrically constructed shapes. Rather utilitarian designs. But it just doesn’t work very well.

What else is there?

Do I need to learn OpenSCAD?

I usually use FreeCAD but lately the constraints solver just feels kinda buggy, crapping out on even fairly simple geometries.

FreeCAD is honestly quite well suited to the 3D modeling I do. Geometrically constructed shapes. Rather utilitarian designs. But it just doesn’t work very well.

What else is there?

Do I need to learn OpenSCAD?

0

Some interesting sauce on staggering layers. It's not bricklayers but achieves stronger prints.

play · youtube.com
YouTube Incredibly strong 3D printing settings using OrcaSlicer 2.3.2! www.youtube.com
preview

Scope it out, the guy tested pla parts on his battle bot with good results. The settings file is in the description. Snag it for experimentation.

Scope it out, the guy tested pla parts on his battle bot with good results. The settings file is in the description. Snag it for experimentation.

0

Free 3d designing software

preview

Looking for free 3d designing software, something easy and intuitive almost that functions like MS paint. Draw shapes the set dimensions. I’ve tried blender and haven’t had luck being any good with it. Again just want to make some shapes set dimensions and then slice and print it

Looking for free 3d designing software, something easy and intuitive almost that functions like MS paint. Draw shapes the set dimensions. I’ve tried blender and haven’t had luck being any good with it. Again just want to make some shapes set dimensions and then slice and print it

0

My first 3D Printer should arrive in ~10 days, anything else I need to buy or get before it arrives?

preview

I’m pretty excited, I ordered the Kobra X, along with 9kg of various colour filaments.

I’m wondering if I’m missing some stuff like bed glue, a scraping tool or things I haven’t even thought of. What do I need in preparation?

I’m pretty excited, I ordered the Kobra X, along with 9kg of various colour filaments.

I’m wondering if I’m missing some stuff like bed glue, a scraping tool or things I haven’t even thought of. What do I need in preparation?

0

Victoria Hand Project: Changing Prosthetic Care with 3D Printing

play · youtube.com
YouTube Victoria Hand Project: Changing Prosthetic Care with 3D Printing www.youtube.com
preview

The Victoria Hand Project from Canada uses 3D printing to create affordable upper-limb prosthetic devices for around 150 USD, customized in just a few days. With its own software and a global network of clinics, prostheses are produced locally, for example in Ukraine and Africa. A key factor behind this success is the reliability and capabilities of the Original Prusa XL and other Prusa 3D printers, which enable fast and precise printing of parts and above-elbow sockets even in challenging conditions.

The Victoria Hand Project from Canada uses 3D printing to create affordable upper-limb prosthetic devices for around 150 USD, customized in just a few days. With its own software and a global network of clinics, prostheses are produced locally, for example in Ukraine and Africa. A key factor behind this success is the reliability and capabilities of the Original Prusa XL and other Prusa 3D printers, which enable fast and precise printing of parts and above-elbow sockets even in challenging conditions.

0

What 3D Printer should I buy as my first?

preview

So the Bambu labs A1 looks like the perfect starting point.

One problem, it uses proprietary firmware and software, I’m a big advocate for owning the things you buy, and not supporting companies that don’t allow you to do that as much as I reasonably can. So yea I can’t buy Bambu.

The Creality SparkX i7 seems nice, it looks like a straight up clone of the A1
store.creality.com/eu/…/sparkx-i7-3d-printer

I’ve heard a lot of people complain about Creality though, so unsure. I’m a bit stuck and getting decision fatigue.

My budget is ~500 Euro.

Help.

So the Bambu labs A1 looks like the perfect starting point.

One problem, it uses proprietary firmware and software, I’m a big advocate for owning the things you buy, and not supporting companies that don’t allow you to do that as much as I reasonably can. So yea I can’t buy Bambu.

The Creality SparkX i7 seems nice, it looks like a straight up clone of the A1
store.creality.com/eu/…/sparkx-i7-3d-printer

I’ve heard a lot of people complain about Creality though, so unsure. I’m a bit stuck and getting decision fatigue.

My budget is ~500 Euro.

Help.

0

STL file for M1 garand butt plate

preview

I am the armorer for our VFW honor guard. We use M1 Garands for funeral services. I want to replace the buttplates with plastic, as when we are at attention, the steel buttplate is on the ground, and gets white shirts very dirty when we shoulder arms. Does anyone have a stl for a plastic buttplate?

I am the armorer for our VFW honor guard. We use M1 Garands for funeral services. I want to replace the buttplates with plastic, as when we are at attention, the steel buttplate is on the ground, and gets white shirts very dirty when we shoulder arms. Does anyone have a stl for a plastic buttplate?

0

AR Folding Stock Adapter

preview

Ive been looking for an AR folding stock adapter for my AR Pistol (PSA 300 Blk Out) and was wondering if anyone had a model for it like this one? Thanks so much, I am new here, so please go easy lol

Ive been looking for an AR folding stock adapter for my AR Pistol (PSA 300 Blk Out) and was wondering if anyone had a model for it like this one? Thanks so much, I am new here, so please go easy lol

0

DMB D.R.U.M Mag variants?

preview

cross-posted from: forum.guncadindex.com/post/176226

Is there any other variants or modifications anyone is familiar with? The most obvious iteration would be different calibers, alt designs (such as changing rachet arm spring retention from a post to a recess)

cross-posted from: forum.guncadindex.com/post/176226

Is there any other variants or modifications anyone is familiar with? The most obvious iteration would be different calibers, alt designs (such as changing rachet arm spring retention from a post to a recess)

0

Mac22 buildguide

preview

Hey,

im looking for a documentation explaining how exactly to build the Mac22. Normally i had good documentations to follow through, but with the Mac22 im kind of struggling, because even the exploded views dont show clearly what belongs where.

Thanks in advance!

Hey,

im looking for a documentation explaining how exactly to build the Mac22. Normally i had good documentations to follow through, but with the Mac22 im kind of struggling, because even the exploded views dont show clearly what belongs where.

Thanks in advance!

0

Henry Model X 357/38spec Handguard

preview

I just got my first 3d printer a couple weeks ago and I’m struggling to find a handguard design for my new Henry Model X. Does anyone have a file you can direct me toward? Or any design experts that want to make one? I’m brand new to this so I don’t know how to design my own stl file yet.

I just got my first 3d printer a couple weeks ago and I’m struggling to find a handguard design for my new Henry Model X. Does anyone have a file you can direct me toward? Or any design experts that want to make one? I’m brand new to this so I don’t know how to design my own stl file yet.

0

Polymaker PLA Pro Metallic Gold causing nozzle clogs?

preview

cross-posted from: forum.guncadindex.com/post/166583

1000041339

This is a fairly new 0.4mm hardened nozzle in a Bambu P1S, the nozzle has maybe 100hrs on it with the only other filament being Overture PLA Pro Black. I switched to the Polymaker Metallic filament, got it calibrated, then printed 2 good parts. This handguard has since failed twice with the nozzle getting clogged. The longest part is the last print where it made it roughly 85% of the way and clogged before printing the threads…

This is my only spool of the material and I only have enough left for 1 more attempt, it’s a nearly 18hr print. Is the Metallic glitter within the filament what’s causing the clogs? Any tips or suggestions to avoid clogs with this material? Yesterday I took the extruder about and cleaned it well thinking that it could be contributing.

cross-posted from: forum.guncadindex.com/post/166583

1000041339

This is a fairly new 0.4mm hardened nozzle in a Bambu P1S, the nozzle has maybe 100hrs on it with the only other filament being Overture PLA Pro Black. I switched to the Polymaker Metallic filament, got it calibrated, then printed 2 good parts. This handguard has since failed twice with the nozzle getting clogged. The longest part is the last print where it made it roughly 85% of the way and clogged before printing the threads…

This is my only spool of the material and I only have enough left for 1 more attempt, it’s a nearly 18hr print. Is the Metallic glitter within the filament what’s causing the clogs? Any tips or suggestions to avoid clogs with this material? Yesterday I took the extruder about and cleaned it well thinking that it could be contributing.

0

Elegoo N4Pro upgrade with Volcano and 3x5015

preview

Good afternoon

This question has probably been asked thousands of times already, but still

I have Neptune4Pro, I would like to change the hotend to Volcano and install a 3x5015 airflow

Is there any guide for green noobs like me, preferably with pictures? I could print model and buy volcano, but how to set things up - big question for me…

Or, if anyone could help, I would write such a guide, photographing and documenting everything during the upgrade process

Seems it is the only model i could find -> www.printables.com/model/…/files

And seems there no remix of such with this one? -> printables.com/…/905447-sf-3x5015-neptune-4-fan-m…

Thank you very much

Good afternoon

This question has probably been asked thousands of times already, but still

I have Neptune4Pro, I would like to change the hotend to Volcano and install a 3x5015 airflow

Is there any guide for green noobs like me, preferably with pictures? I could print model and buy volcano, but how to set things up - big question for me…

Or, if anyone could help, I would write such a guide, photographing and documenting everything during the upgrade process

Seems it is the only model i could find -> www.printables.com/model/…/files

And seems there no remix of such with this one? -> printables.com/…/905447-sf-3x5015-neptune-4-fan-m…

Thank you very much

0

The future is now. I generated this on the AI Horde, then converted it into a 3d model and printed it!

preview

Lighter for scale

I wanted to make a gargoyle as a gift, but I couldn’t find one that fit my vision. So I turned to some tools for my personal projects.

First of all I generated it using the Qwen-Image model on the AI Horde

Then I used the Hunuan 3D 3.0 model to convert this into a 3D model and finally I printed it on my Bambulab A1 at 300%.

Turned out amazing. Literally no flaws and extremely smooth finish everywhere.

Lighter for scale

I wanted to make a gargoyle as a gift, but I couldn’t find one that fit my vision. So I turned to some tools for my personal projects.

First of all I generated it using the Qwen-Image model on the AI Horde

Then I used the Hunuan 3D 3.0 model to convert this into a 3D model and finally I printed it on my Bambulab A1 at 300%.

Turned out amazing. Literally no flaws and extremely smooth finish everywhere.

0

PETG weird edge issue

preview

Hey folks,

I was printing a frame with a fresh unopened roll of PETG. I haven’t seen this type of thing before. I’m guessing it’s because I tried a new (to me) cura setting to move the seam to the corner.

Besides this area, everything came out great.

Any tips on how to get PETG and corner seams to not do this? (Or is the issue unrelated?)

Hey folks,

I was printing a frame with a fresh unopened roll of PETG. I haven’t seen this type of thing before. I’m guessing it’s because I tried a new (to me) cura setting to move the seam to the corner.

Besides this area, everything came out great.

Any tips on how to get PETG and corner seams to not do this? (Or is the issue unrelated?)

0

Need some help with PETG on Bambu P1S

preview

I’ve spent the last few days trying to get PETG to print on the P1S.

PLA and PLA Pro printed great with no change to settings and just using the default 0.4 nozzle 0.16mm optimized presets in Orca. Examples: imgur.com/a/lx7KzRA

PETG, on the other hand, has been a pain in the ass. The preset for PolyLite PETG failed on my first print miserably, so I aborted after the first few layers. I then attempted a flow rate test as it was under extruding, that test was a failure, and continued to fail until I increased the flow rate from 0.95 to 1.197. At this point, I adjusted it per pass 1 and 2 but was still having issues. I printed a temp tower and decided on a 255C first layer with 250C additional layers. Still no dice, so I looked for suggestions on YouTube. Found a guy swearing by increasing the temp to 279C on the P1S. I tried that, went through all filament calibration tests from flow rate, pressure advance, retraction, max flowrate, and VFA. Tests were looking good, so I tried the original failed print once again, and it turned out pretty good other than the underside of the arch. I used Tree (Auto), but that evidently wasn’t good enough. The print is functional, and as everything looked good and my next parts didn’t have overhangs, I decided to give them a go. These were complete fails and underextruding all around. I imagine the increased temp along with the pauses for movement on this print may have contributed to burning the filament. Examples: imgur.com/a/2nOJ7hb

In short, im at my wits end with PETG on this printer, and it’s apparently a common issue. I dried for 6 hours at 65C, then kept the filament in a Sunlu S2 at 55C while printing. 0.4mm hardened steel nozzle, 0.16mm Optimal Preset with walls set to “3” and printing order set to “inner/outer/inner”, using the stock Textured PEI build plate, PolyLite Grey PETG, P1S on firmware V01.08.00.00, and Orca on v2.3.1.

If anyone can share their PETG settings, im all ears, thanks.

I’ve spent the last few days trying to get PETG to print on the P1S.

PLA and PLA Pro printed great with no change to settings and just using the default 0.4 nozzle 0.16mm optimized presets in Orca. Examples: imgur.com/a/lx7KzRA

PETG, on the other hand, has been a pain in the ass. The preset for PolyLite PETG failed on my first print miserably, so I aborted after the first few layers. I then attempted a flow rate test as it was under extruding, that test was a failure, and continued to fail until I increased the flow rate from 0.95 to 1.197. At this point, I adjusted it per pass 1 and 2 but was still having issues. I printed a temp tower and decided on a 255C first layer with 250C additional layers. Still no dice, so I looked for suggestions on YouTube. Found a guy swearing by increasing the temp to 279C on the P1S. I tried that, went through all filament calibration tests from flow rate, pressure advance, retraction, max flowrate, and VFA. Tests were looking good, so I tried the original failed print once again, and it turned out pretty good other than the underside of the arch. I used Tree (Auto), but that evidently wasn’t good enough. The print is functional, and as everything looked good and my next parts didn’t have overhangs, I decided to give them a go. These were complete fails and underextruding all around. I imagine the increased temp along with the pauses for movement on this print may have contributed to burning the filament. Examples: imgur.com/a/2nOJ7hb

In short, im at my wits end with PETG on this printer, and it’s apparently a common issue. I dried for 6 hours at 65C, then kept the filament in a Sunlu S2 at 55C while printing. 0.4mm hardened steel nozzle, 0.16mm Optimal Preset with walls set to “3” and printing order set to “inner/outer/inner”, using the stock Textured PEI build plate, PolyLite Grey PETG, P1S on firmware V01.08.00.00, and Orca on v2.3.1.

If anyone can share their PETG settings, im all ears, thanks.

0

Issues with model, slicing or printer settings and/or calibration?

preview

I got a Prusa CORE One earlier this year, and so far I’ve been very happy. I have not ventured outside of the default settings though, and I use their own filament (only PLA). This has worked perfectly fine so far, but now I ran into an issue, and I figure it’s time to come out of the “default settings”-bubble and learn some more about this stuff.

I am trying to print a Gridfinity holder for a rolling pin, so I tried to cut out a appropriately sized cylinder in a template with a boolean operator in Blender. When the print got to the concave portion, the print started to fail - uncertain how to best explain it, but the overhangs over the infill did not properly bridge and the filament started to warp so that the print head would hit it on the next pass (and make some nasty scratching sounds). I stopped the print when I noticed this. See an image here:

I am uncertain whether this is due to the model being poorly optimized for 3D-printing, if the printer settings for the filament were off or if I could’ve tweaked the slicing settings to achieve a better result.

Is it obvious, looking at the image, what the primary reason for this failure is?

Note: I’ve ended up printing this again already with a regular rectangular cutout instead of a cylindrical one, so I am just trying to learn more about what made this fail to learn more.

I got a Prusa CORE One earlier this year, and so far I’ve been very happy. I have not ventured outside of the default settings though, and I use their own filament (only PLA). This has worked perfectly fine so far, but now I ran into an issue, and I figure it’s time to come out of the “default settings”-bubble and learn some more about this stuff.

I am trying to print a Gridfinity holder for a rolling pin, so I tried to cut out a appropriately sized cylinder in a template with a boolean operator in Blender. When the print got to the concave portion, the print started to fail - uncertain how to best explain it, but the overhangs over the infill did not properly bridge and the filament started to warp so that the print head would hit it on the next pass (and make some nasty scratching sounds). I stopped the print when I noticed this. See an image here:

I am uncertain whether this is due to the model being poorly optimized for 3D-printing, if the printer settings for the filament were off or if I could’ve tweaked the slicing settings to achieve a better result.

Is it obvious, looking at the image, what the primary reason for this failure is?

Note: I’ve ended up printing this again already with a regular rectangular cutout instead of a cylindrical one, so I am just trying to learn more about what made this fail to learn more.

0

K1 to Prusa Core One w/ MMU3, worth it?

preview

So I atm have a K1 and it just works. No issues printing wise.

I want to start to do multi color prints and was thinking of getting a Prusa Core One with MMU3.

The main reason is I like the slicer and Prusa doesn’t jam ads and coins down my throat whenever I print. I mainly upload my files to the cloud and send it to printer that way. Is this a good idea or should I just get crealitys multi color upgrade?

WWYD ?

So I atm have a K1 and it just works. No issues printing wise.

I want to start to do multi color prints and was thinking of getting a Prusa Core One with MMU3.

The main reason is I like the slicer and Prusa doesn’t jam ads and coins down my throat whenever I print. I mainly upload my files to the cloud and send it to printer that way. Is this a good idea or should I just get crealitys multi color upgrade?

WWYD ?

0

Have you ever owned a 3d printer that you didn't modify?

preview

Preface: I’m on my third cheap printer in the past ten years. I bought an Anycubic kobra neo a few years ago. I told myself I wouldn’t mess with doing anything to it, but I was running into issues because of low quality control. I put it away due to frustration for the past year and now needed to print something and just figuring out all the issues. Right now I’m looking into upgrading the part cooling fan as I cannot get rid of stringing even on low temps with PLA. I should just buy a good printer but I just don’t feel like I can justify it.

Preface: I’m on my third cheap printer in the past ten years. I bought an Anycubic kobra neo a few years ago. I told myself I wouldn’t mess with doing anything to it, but I was running into issues because of low quality control. I put it away due to frustration for the past year and now needed to print something and just figuring out all the issues. Right now I’m looking into upgrading the part cooling fan as I cannot get rid of stringing even on low temps with PLA. I should just buy a good printer but I just don’t feel like I can justify it.

0

Elegoo Centauri Carbon

preview

I recently got a Centauri Carbon and didn’t find a community specifically for it on the Fediverse so I made one for anyone who is interested. lemmy.world/c/elegoo_centauri_carbon

I recently got a Centauri Carbon and didn’t find a community specifically for it on the Fediverse so I made one for anyone who is interested. lemmy.world/c/elegoo_centauri_carbon

0

Another PHA print! A trackball upgrade

preview

Upgraded my Adept trackball to use the AnyBall 57-68mm mod, with an Aramith tournament series cue ball and Rexroth BTUs.

Sorry for constantly proselytizing about the wonders of PHA lol. But look at this thing! The Adept is pretty ingeniously designed for printing, but I wouldn’t really say it’s an easy print either. There are steeeeep overhangs and really long bridges. After getting the settings dialed in, PHA more or less handled it just fine, and now my trackball is home compostable. It also has this really interesting feel to it, kind of reminds me more of leather than plastic.

Few more pics:

Upgraded my Adept trackball to use the AnyBall 57-68mm mod, with an Aramith tournament series cue ball and Rexroth BTUs.

Sorry for constantly proselytizing about the wonders of PHA lol. But look at this thing! The Adept is pretty ingeniously designed for printing, but I wouldn’t really say it’s an easy print either. There are steeeeep overhangs and really long bridges. After getting the settings dialed in, PHA more or less handled it just fine, and now my trackball is home compostable. It also has this really interesting feel to it, kind of reminds me more of leather than plastic.

Few more pics:

0

Help, I can't find a file for acrylic panles.

preview

Hello peoples, I have some acrylic panels that I have cut to size, and was thinking I could just print some edges / trim to make them nice and give a good finished look to them. Unfortunately my googlefu seems to be lacking and I cannot find what I am looking for. Can I get an assist in locating a or a few files. I dont doubt my abilities to make one if needed, but I have a few things going on and am looking for a simple solution. Thank you for you time!

UPDATE: What up nerds, I made my own. here’s a link in case anyone wants some! printables.com/…/1355605-edge-trim-for-25mm-acryl…

Hello peoples, I have some acrylic panels that I have cut to size, and was thinking I could just print some edges / trim to make them nice and give a good finished look to them. Unfortunately my googlefu seems to be lacking and I cannot find what I am looking for. Can I get an assist in locating a or a few files. I dont doubt my abilities to make one if needed, but I have a few things going on and am looking for a simple solution. Thank you for you time!

UPDATE: What up nerds, I made my own. here’s a link in case anyone wants some! printables.com/…/1355605-edge-trim-for-25mm-acryl…

0

I 3d printed a custom sized keyboard using open source software and hardware designs.

preview

The design is based on the excellent Dactyl keyboard, generated with ryanis.cool/cosmos/ and it runs the excellent qmk firmware. It is handwired:

and I have also made a palm support using inkscape and openscad

All printed on a reprap prusa i3 derivative.

This helps me use my computer with less pain, so I want to call out all the wonderful projects and people who contribute to them which made it possible.

Total cost? $60 aud, amortised filament ~15 bucks worth maybe? and a lot of my time haha.

The design is based on the excellent Dactyl keyboard, generated with ryanis.cool/cosmos/ and it runs the excellent qmk firmware. It is handwired:

and I have also made a palm support using inkscape and openscad

All printed on a reprap prusa i3 derivative.

This helps me use my computer with less pain, so I want to call out all the wonderful projects and people who contribute to them which made it possible.

Total cost? $60 aud, amortised filament ~15 bucks worth maybe? and a lot of my time haha.

0

Stringing/Oozing Problem

preview

I am using an Ender 3 Pro v2, and I have followed multiple guides (they all say the same things) for setting up a print to prevent stringing. I’ve also switched between two filaments (Creality and Amolen) and the stringing doesn’t change at all. I have noticed that when heating up the horned, the filament just oozes out like ectoplasm even before the print starts.

I have never had this problem before, and could use some human advice.

I have upgraded/replaced the following parts in the past:

  1. Bowden Tubes
  2. Printer Nozzles
  3. Dual Gear Extruder
  4. Heater Block
  5. Heater Cartridge
  6. Thermistor Temp Sensor

My Tweaked Settings:

I am using an Ender 3 Pro v2, and I have followed multiple guides (they all say the same things) for setting up a print to prevent stringing. I’ve also switched between two filaments (Creality and Amolen) and the stringing doesn’t change at all. I have noticed that when heating up the horned, the filament just oozes out like ectoplasm even before the print starts.

I have never had this problem before, and could use some human advice.

I have upgraded/replaced the following parts in the past:

  1. Bowden Tubes
  2. Printer Nozzles
  3. Dual Gear Extruder
  4. Heater Block
  5. Heater Cartridge
  6. Thermistor Temp Sensor

My Tweaked Settings:

0

Recommendations for a Plug-n-Play / Walk-Away 3D-Printer

preview

I have cut my teeth on the Ender 3 Pro v2 printer by Creality. Neat little printer; it works wonders when/if it’s perfectly dialed in. The thing is, I don’t have the interest to dial it in like it needs to be. I just want to turn it on, send it a print, and walk away. I do t want to spend all morning (like this morning) trying to “auto-level” 🙄 the bed, just to not have it be level.

When I try to manually level the bed it’s worse: I can measure one corner 5 times in a row, and get 5 wildly different heights each time. And I’m even using the Creality BL Touch sensor!

I have upgraded the springs, and I’m using the wide knob’s, and spent days trying to tune in my printer. I’m also using the Jyers Marlin firmware (15x15).

It’s exhausting and not fun. Help me Make Printing Fun Again. 😩

I have cut my teeth on the Ender 3 Pro v2 printer by Creality. Neat little printer; it works wonders when/if it’s perfectly dialed in. The thing is, I don’t have the interest to dial it in like it needs to be. I just want to turn it on, send it a print, and walk away. I do t want to spend all morning (like this morning) trying to “auto-level” 🙄 the bed, just to not have it be level.

When I try to manually level the bed it’s worse: I can measure one corner 5 times in a row, and get 5 wildly different heights each time. And I’m even using the Creality BL Touch sensor!

I have upgraded the springs, and I’m using the wide knob’s, and spent days trying to tune in my printer. I’m also using the Jyers Marlin firmware (15x15).

It’s exhausting and not fun. Help me Make Printing Fun Again. 😩

0

My Best Ever Tolerance Test

preview

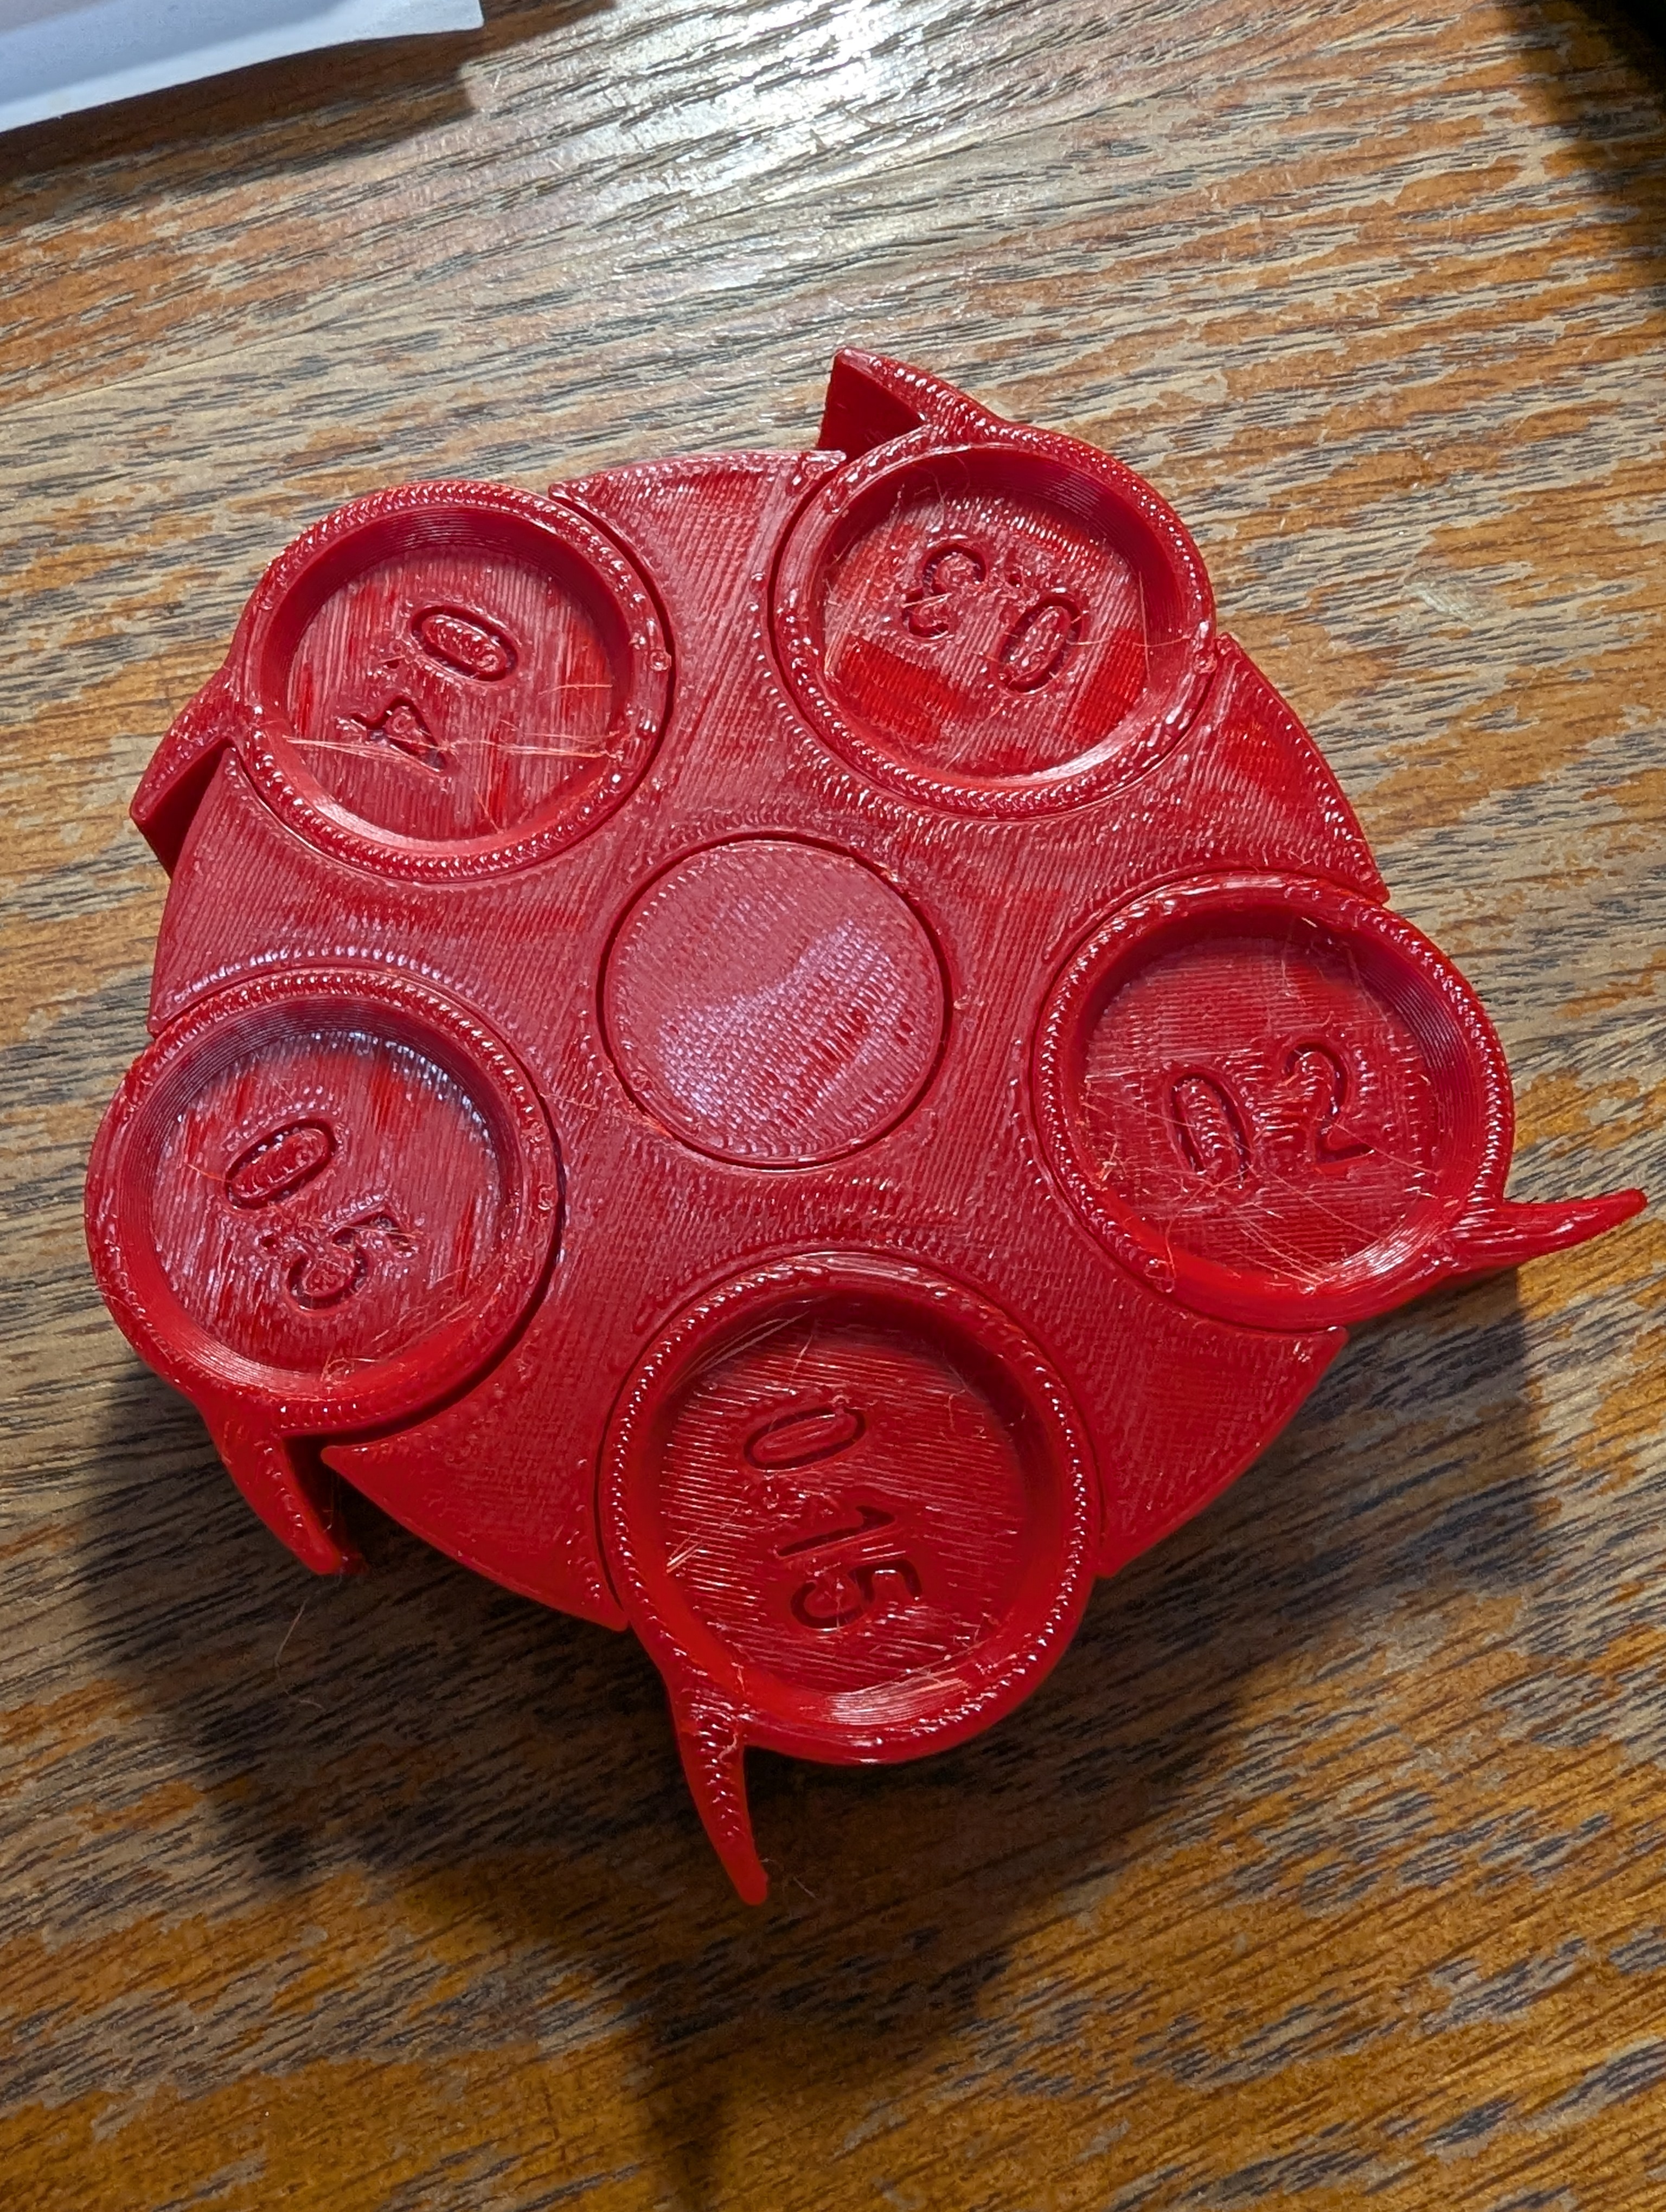
As the title says, this is the best tolerance test I’ve been able to produce since I first started printing a few years ago. There’s stringing, but that would be solved if I dried it, yes I dry pla too. This print is the Sci3d Clearance Test as downloaded in January 2023, from 0.5mm to 0.15mm clearances.

Every spinner is loose and easily moves, I actually had a bit of trouble with the center spindle due to a bit of over extrusion on the top layers.

My machine is a modified ender 3 pro with Klipper. Currently have a 0.4mm hardened steel nozzle mounted with 0.2mm layer heights.

Sliced with the latest release prusaslicer, custom printer, filament, and print profiles.

The filament is one of my favorite PLAs, Voxel PLA, this one is red, but they all print the same for me.

Sorry for the boring post, but this was a huge achievement for me and basically everyone I know wouldn’t understand the magnitude of this kind of repeatable precision on such a low cost machine.

As the title says, this is the best tolerance test I’ve been able to produce since I first started printing a few years ago. There’s stringing, but that would be solved if I dried it, yes I dry pla too. This print is the Sci3d Clearance Test as downloaded in January 2023, from 0.5mm to 0.15mm clearances.

Every spinner is loose and easily moves, I actually had a bit of trouble with the center spindle due to a bit of over extrusion on the top layers.

My machine is a modified ender 3 pro with Klipper. Currently have a 0.4mm hardened steel nozzle mounted with 0.2mm layer heights.

Sliced with the latest release prusaslicer, custom printer, filament, and print profiles.

The filament is one of my favorite PLAs, Voxel PLA, this one is red, but they all print the same for me.

Sorry for the boring post, but this was a huge achievement for me and basically everyone I know wouldn’t understand the magnitude of this kind of repeatable precision on such a low cost machine.

0

Let PETG 3D-printed parts cool down slowly on the bed of the printer to avoid warping

preview

I’ve been printing quite a few registration plates to hold parts in place in production that need to sit as flat as possible on the production jigs.

I’ve noticed that taking the finished parts off the bed of the printer too soon causes them to warp: they come off the bed looking nicely set and straight, but as they finish cooling down unsupported, they slowly warp until they finally fully reach room temperature after 10 or 15 minutes.

So now I let them cool down slowly on the bed of the printer after the print is done. Ideally I let the bed cool down to room temperature: then the parts readily separate naturally as they shrink. If I’m in a hurry, I’ll still wait until the parts release with very little force, around 35C - but no hotter than that, to avoid warping - as in this video.

I’ve been printing quite a few registration plates to hold parts in place in production that need to sit as flat as possible on the production jigs.

I’ve noticed that taking the finished parts off the bed of the printer too soon causes them to warp: they come off the bed looking nicely set and straight, but as they finish cooling down unsupported, they slowly warp until they finally fully reach room temperature after 10 or 15 minutes.

So now I let them cool down slowly on the bed of the printer after the print is done. Ideally I let the bed cool down to room temperature: then the parts readily separate naturally as they shrink. If I’m in a hurry, I’ll still wait until the parts release with very little force, around 35C - but no hotter than that, to avoid warping - as in this video.